Saturday, 16 November 2013

Android Sensor Example

                                    Android Sensor Example

Welcome Friend,
            In this example i going to show a list of Sensor on a ListView that are available in device.In last Sensor post i told you how we create sensor base example.

And also explain Proximity sensor :- Proximity sensor sense the object minimum 0 to approx 2.5 cm.
so if any object come nearer to 2.5 cm from sensor it can generate some event.

Code for layout xml file: 

    xmlns:tools="http://schemas.android.com/tools"
    android:id="@+id/LinearLayout1"
    android:layout_width="match_parent"
    android:layout_height="match_parent"
    android:orientation="vertical"
    android:paddingBottom="@dimen/activity_vertical_margin"
    android:paddingLeft="@dimen/activity_horizontal_margin"
    android:paddingRight="@dimen/activity_horizontal_margin"
    android:paddingTop="@dimen/activity_vertical_margin"
    tools:context=".MainActivity" >

   
        android:id="@+id/button1"
        android:layout_width="match_parent"
        android:layout_height="wrap_content"
        android:text="Scan Sensor" />

   
        android:id="@+id/spinner1"
        android:layout_width="match_parent"
        android:layout_height="wrap_content" />

   
        android:id="@+id/listView1"
        android:layout_width="match_parent"
        android:layout_height="216dp" >


        android:id="@+id/imageSwitcher1"
        android:layout_width="match_parent"
        android:layout_height="match_parent"
        android:layout_gravity="bottom" >


package in.androidshivendra.androidsensorexample;

import java.util.List;


import android.hardware.Sensor;
import android.hardware.SensorEvent;
import android.hardware.SensorEventListener;
import android.hardware.SensorManager;
import android.os.Bundle;
import android.app.Activity;
import android.util.Log;
import android.view.Menu;
import android.view.View;
import android.view.ViewGroup.LayoutParams;
import android.widget.AdapterView;
import android.widget.AdapterView.OnItemClickListener;
import android.widget.ArrayAdapter;
import android.widget.Button;
import android.widget.ImageSwitcher;
import android.widget.ImageView;
import android.widget.ViewSwitcher.ViewFactory;

import android.widget.ListView;
import android.widget.Toast;

public class MainActivity extends Activity implements SensorEventListener ,ViewFactory{

Button bscan;
ListView lv;
SensorManager smgr;
List msensor;

ImageSwitcher iv;
Sensor ses;
@Override
protected void onCreate(Bundle savedInstanceState) {
super.onCreate(savedInstanceState);
try{
setContentView(R.layout.activity_main);
bscan = (Button)findViewById(R.id.button1);
lv = (ListView)findViewById(R.id.listView1);
smgr = (SensorManager)getSystemService(SENSOR_SERVICE);
msensor=smgr.getSensorList(Sensor.TYPE_ALL);
iv = (ImageSwitcher) findViewById(R.id.imageSwitcher1);
iv.setFactory(this);
final ArrayAdapter asens = new ArrayAdapter(MainActivity.this, android.R.layout.simple_list_item_1,msensor);
bscan.setOnClickListener(new View.OnClickListener(){

@Override
public void onClick(View v) {
// TODO Auto-generated method stub
lv.setAdapter(asens);
}});
lv.setOnItemClickListener(new OnItemClickListener() {

@Override
public void onItemClick(AdapterView parent, View v, int pos,
long id) {
// TODO Auto-generated method stub
Toast.makeText(MainActivity.this, msensor.get(pos).getName(), Toast.LENGTH_SHORT).show();
}
});
}
catch(Exception e)
{
Toast.makeText(MainActivity.this, e.toString(), Toast.LENGTH_LONG).show();
Log.d("Sensor example", e.toString());
}
}

@Override
public boolean onCreateOptionsMenu(Menu menu) {
// Inflate the menu; this adds items to the action bar if it is present.
getMenuInflater().inflate(R.menu.main, menu);
return true;
}

@Override
public void onAccuracyChanged(Sensor sensor, int accuracy) {
// TODO Auto-generated method stub
}

@Override
public void onSensorChanged(SensorEvent event) {
// TODO Auto-generated method stub
if(event.values[0] == 0){
iv.setImageResource(R.drawable.near);
}else{
iv.setImageResource(R.drawable.far);
}
}
protected void onResume() {
super.onResume();
ses = smgr.getDefaultSensor(Sensor.TYPE_PROXIMITY);
smgr.registerListener(this, ses, SensorManager.SENSOR_DELAY_NORMAL);
}

protected void onPause() {
super.onPause();
smgr.unregisterListener(this);
}

@Override
public View makeView() {
// TODO Auto-generated method stub
ImageView iv = new ImageView(this);
iv.setScaleType(ImageView.ScaleType.FIT_CENTER);
iv.setLayoutParams(new ImageSwitcher.LayoutParams(LayoutParams.FILL_PARENT, LayoutParams.FILL_PARENT));
return iv;
}

}


Note: This application only Test on Real Device.You can download Application here


Android Rating Bar Example

Android Rating Bar

            It is use to take user feedback from form.

Activity layout code:
 create activity_main.xml in layout folder.


    xmlns:tools="http://schemas.android.com/tools"
    android:id="@+id/LinearLayout1"
    android:layout_width="match_parent"
    android:layout_height="match_parent"
    android:orientation="vertical"
    android:paddingBottom="@dimen/activity_vertical_margin"
    android:paddingLeft="@dimen/activity_horizontal_margin"
    android:paddingRight="@dimen/activity_horizontal_margin"
    android:paddingTop="@dimen/activity_vertical_margin"
    tools:context=".MainActivity" >

   
        android:id="@+id/textView1"
        android:layout_width="match_parent"
        android:layout_height="wrap_content"
        android:layout_centerInParent="true"
        android:layout_gravity="center"
        android:autoLink="web"
        android:gravity="center"
        android:text="@string/exname" />

   
        android:id="@+id/ratingBar1"
        android:layout_width="wrap_content"
        android:layout_height="wrap_content"
        android:layout_gravity="center" />

   
        android:id="@+id/button1"
        android:layout_width="match_parent"
        android:layout_height="wrap_content"
        android:layout_gravity="fill_horizontal"
        android:text="Show Rating" />

Java source code for creating gridview.

packagein.androidshivendra.androidratingexample;

import android.os.Bundle;
import android.app.Activity;
import android.view.Menu;
import android.view.View;
import android.widget.Button;
import android.widget.RatingBar;
import android.widget.Toast;

public class MainActivity extends Activity {

@Override
protected void onCreate(Bundle savedInstanceState) {
super.onCreate(savedInstanceState);
setContentView(R.layout.activity_main);
Button btn = (Button)findViewById(R.id.button1);
final RatingBar rb = (RatingBar)findViewById(R.id.ratingBar1);
btn.setOnClickListener(new View.OnClickListener() {
@Override
public void onClick(View v) {
// TODO Auto-generated method stub
float rate = rb.getRating();
Toast.makeText(MainActivity.this, "You have given "+rate+"point", Toast.LENGTH_LONG).show();
}
});
}

@Override
public boolean onCreateOptionsMenu(Menu menu) {
// Inflate the menu; this adds items to the action bar if it is present.
getMenuInflater().inflate(R.menu.main, menu);
return true;
}

}
OutPut Screen:


Wednesday, 13 November 2013

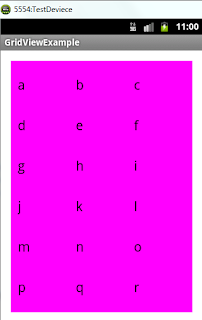
Android GridView Example


In Android we can create our application may represent in Grid view or Listview. In this post i explained android Gridview example.

Java source code for creating gridview.

package in.androidshivendra.listexampleproject;


import android.os.Bundle;
import android.app.Activity;
import android.view.Menu;
import android.widget.ArrayAdapter;
import android.widget.GridView;

public class GridViewExample extends Activity {
String [] abc={"a","b","c","d","e","f","g","h","i","j","k","l","m","n","o","p","q","r","s","t","u","v","w","x","y","z"};
GridView gv;
@Override
protected void onCreate(Bundle savedInstanceState) {
super.onCreate(savedInstanceState);
setContentView(R.layout.activity_grid_view_example);
GridView gv = (GridView)findViewById(R.id.gridView1);
ArrayAdapteradp=new ArrayAdapter(GridViewExample.this, 
android.R.layout.simple_list_item_1,City);
gv.setAdapter(adp);
}

@Override
public boolean onCreateOptionsMenu(Menu menu) {
// Inflate the menu; this adds items to the action bar if it is present.
getMenuInflater().inflate(R.menu.grid_view_example, menu);
return true;
}

}

Activity layout code:
 create activity_grid_view_example.xml in layout folder.


    xmlns:tools="http://schemas.android.com/tools"
    android:id="@+id/LinearLayout1"
    android:layout_width="match_parent"
    android:layout_height="match_parent"
    android:orientation="vertical"
    android:paddingBottom="@dimen/activity_vertical_margin"
    android:paddingLeft="@dimen/activity_horizontal_margin"
    android:paddingRight="@dimen/activity_horizontal_margin"
    android:paddingTop="@dimen/activity_vertical_margin"
    tools:context=".GridViewExample" >

    
        android:id="@+id/gridView1"
        android:layout_width="match_parent"
        android:layout_height="wrap_content"
        android:numColumns="3" >

List Activity Example

     List Activity Example

Hello Friend,
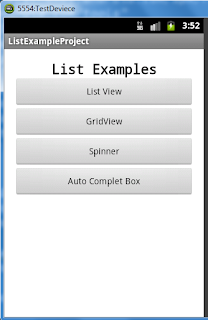
 In this post i am going to explain various type of list related control like, ListView, GridView, Spinner and AutoCompleteBox etc. Listview is one of the impressive way to represent data in list.

Create an project name ListExampleProject.

create HomeActivity.java in src folder.
Code For HomeActivity:-


package in.androidshivendra.listexampleproject;

import android.os.Bundle;
import android.app.Activity;
import android.content.Intent;
import android.view.Menu;
import android.view.View;

public class HomeActivity extends Activity {

@Override
protected void onCreate(Bundle savedInstanceState) {
super.onCreate(savedInstanceState);
setContentView(R.layout.activity_home);
}

@Override
public boolean onCreateOptionsMenu(Menu menu) {
// Inflate the menu; this adds items to the action bar if it is present.
getMenuInflater().inflate(R.menu.home, menu);
return true;
}
public void nextActivity(View v)
{
Intent i = new Intent();
switch(v.getId())
{
case R.id.button1: i.setClass(HomeActivity.this, ListViewExample.class);
startActivity(i);
break;
case R.id.button2: i.setClass(HomeActivity.this, GridViewExample.class);
startActivity(i);
break;
case R.id.button3: i.setClass(HomeActivity.this, AutoCompleteBoxExample.class);
startActivity(i);
break;
case R.id.button4: i.setClass(HomeActivity.this, SpinnerExample.class);
startActivity(i);
break;
}
}

}
create a xml file within res/layout/activity_home.xml


    xmlns:tools="http://schemas.android.com/tools"
    android:id="@+id/LinearLayout1"
    android:layout_width="match_parent"
    android:layout_height="match_parent"
    android:orientation="vertical"
    android:paddingBottom="@dimen/activity_vertical_margin"
    android:paddingLeft="@dimen/activity_horizontal_margin"
    android:paddingRight="@dimen/activity_horizontal_margin"
    android:paddingTop="@dimen/activity_vertical_margin"
    tools:context=".HomeActivity" >

   
        android:id="@+id/textView1"
        android:layout_width="match_parent"
        android:layout_height="wrap_content"
        android:gravity="center"
        android:text="List Examples"
        android:textAppearance="?android:attr/textAppearanceLarge"
        android:textStyle="bold"
        android:typeface="monospace" />


// Now For creating ListView you have to done these steps.
1. Put a ListView on layout xml file.
2.Initiate ListView at Java Src File.
3.Create an Array.
4.Crate an ArrayAdapter object by this way.
ArrayAdapter adp = new ArrayAdapter(context,resource_view,array);
5set the adapter on ListView object.

Complete code:-


package in.androidshivendra.listexampleproject;

import android.os.Bundle;
import android.app.Activity;
import android.view.Menu;
import android.view.View;
import android.widget.AdapterView;
import android.widget.AdapterView.OnItemClickListener;
import android.widget.ArrayAdapter;
import android.widget.ListView;
import android.widget.Toast;

public class ListViewExample extends Activity {


String state[] = {"Bihar","Delhi","Punjab","UP","Rajasthan"};
ListView lv;
@Override
protected void onCreate(Bundle savedInstanceState) {
super.onCreate(savedInstanceState);
setContentView(R.layout.activity_list_view_example);
lv = (ListView)findViewById(R.id.listView1);
ArrayAdapter adp = new ArrayAdapter
(ListViewExample.this, android.R.layout.simple_list_item_1,state);

lv.setAdapter(adp);
// To Apply click listener on list items.

lv.setOnItemClickListener(new AdapterView.OnItemClickListener() {

@Override
public void onItemClick(AdapterView parent, View v, int position,
long id) {
// TODO Auto-generated method stub
Toast.makeText(ListViewExample.this, state[position]+" is clicked", Toast.LENGTH_LONG).show();

}
});

}

@Override
public boolean onCreateOptionsMenu(Menu menu) {
// Inflate the menu; this adds items to the action bar if it is present.
getMenuInflater().inflate(R.menu.list_view_example, menu);
return true;
}

}

create a xml file with in src/activity_list_view_example.xml

    xmlns:tools="http://schemas.android.com/tools"
    android:id="@+id/LinearLayout1"
    android:layout_width="match_parent"
    android:layout_height="match_parent"
    android:orientation="vertical"
    android:paddingBottom="@dimen/activity_vertical_margin"
    android:paddingLeft="@dimen/activity_horizontal_margin"
    android:paddingRight="@dimen/activity_horizontal_margin"
    android:paddingTop="@dimen/activity_vertical_margin"
    tools:context=".ListViewExample" >

            android:id="@+id/listView1"
        android:layout_width="match_parent"
        android:layout_height="wrap_content" >


Android Grid View Example

Java source code for creating gridview.

package in.androidshivendra.listexampleproject;


import android.os.Bundle;
import android.app.Activity;
import android.view.Menu;
import android.widget.ArrayAdapter;
import android.widget.GridView;

public class GridViewExample extends Activity {
String [] abc={"a","b","c","d","e","f","g","h","i","j","k","l","m","n","o","p","q","r","s","t","u","v","w","x","y","z"};
GridView gv;
@Override
protected void onCreate(Bundle savedInstanceState) {
super.onCreate(savedInstanceState);
setContentView(R.layout.activity_grid_view_example);
GridView gv = (GridView)findViewById(R.id.gridView1);
ArrayAdapteradp=new ArrayAdapter(GridViewExample.this, 
android.R.layout.simple_list_item_1,City);
gv.setAdapter(adp);
}

@Override
public boolean onCreateOptionsMenu(Menu menu) {
// Inflate the menu; this adds items to the action bar if it is present.
getMenuInflater().inflate(R.menu.grid_view_example, menu);
return true;
}

}

Activity layout code:
 create activity_grid_view_example.xml in layout folder.


    xmlns:tools="http://schemas.android.com/tools"
    android:id="@+id/LinearLayout1"
    android:layout_width="match_parent"
    android:layout_height="match_parent"
    android:orientation="vertical"
    android:paddingBottom="@dimen/activity_vertical_margin"
    android:paddingLeft="@dimen/activity_horizontal_margin"
    android:paddingRight="@dimen/activity_horizontal_margin"
    android:paddingTop="@dimen/activity_vertical_margin"
    tools:context=".GridViewExample" >

   
        android:id="@+id/gridView1"
        android:layout_width="match_parent"
        android:layout_height="wrap_content"
        android:numColumns="3" >
   

Spinner Example:-

spinner is used as combo box. it provide drop down list.

java source code:-
package in.androidshivendra.listexampleproject;


import android.os.Bundle;
import android.app.Activity;
import android.view.Menu;
import android.view.View;
import android.widget.AdapterView;
import android.widget.AdapterView.OnItemSelectedListener;
import android.widget.ArrayAdapter;
import android.widget.RatingBar;
import android.widget.Spinner;
import android.widget.Toast;

public class SpinnerExample extends Activity {
String [] rate={"0.5","1","1.5","2","2.5","3","3.5","4","4.5","5"};
Spinner sp;
RatingBar rb;
@Override
protected void onCreate(Bundle savedInstanceState) {
super.onCreate(savedInstanceState);
setContentView(R.layout.activity_spinner_example);
sp=(Spinner)findViewById(R.id.spinner1);
rb=(RatingBar)findViewById(R.id.ratingBar1);
ArrayAdapteradp=new ArrayAdapter(SpinnerExample.this, 
R.layout.row,rate);
sp.setAdapter(adp);
sp.setOnItemSelectedListener(new OnItemSelectedListener() {

@Override
public void onItemSelected(AdapterView parent, View v,
int pos, long id) {
// TODO Auto-generated method stub
rb.setRating(Float.parseFloat(rate[pos]));
}

@Override
public void onNothingSelected(AdapterView arg0) {
// TODO Auto-generated method stub
Toast.makeText(SpinnerExample.this, "No Rating Given", Toast.LENGTH_LONG).show();
}
});
}

@Override
public boolean onCreateOptionsMenu(Menu menu) {
// Inflate the menu; this adds items to the action bar if it is present.
getMenuInflater().inflate(R.menu.spinner_example, menu);
return true;
}

}

Activity layout code:
 create activity_spinner_example.xml in layout folder.


    xmlns:tools="http://schemas.android.com/tools"
    android:id="@+id/LinearLayout1"
    android:layout_width="match_parent"
    android:layout_height="match_parent"
    android:orientation="vertical"
    android:paddingBottom="@dimen/activity_vertical_margin"
    android:paddingLeft="@dimen/activity_horizontal_margin"
    android:paddingRight="@dimen/activity_horizontal_margin"
    android:paddingTop="@dimen/activity_vertical_margin"
    tools:context=".SpinnerExample" >

   
        android:id="@+id/spinner1"
        android:layout_width="match_parent"
        android:layout_height="wrap_content" />

   
        android:id="@+id/ratingBar1"
        android:layout_width="match_parent"
        android:layout_height="wrap_content"
        android:layout_gravity="bottom" />


 AutoCompleteTextView Example:-


java source code:-

package in.androidshivendra.listexampleproject;


import android.os.Bundle;
import android.app.Activity;
import android.view.Menu;
import android.widget.ArrayAdapter;
import android.widget.AutoCompleteTextView;

public class AutoCompleteBoxExample extends Activity {
String studentname[]= {"Pradeep","Tarun","Saan","Mukesh","Manish","Nikhil","Sunil"};
AutoCompleteTextView av;
@Override
protected void onCreate(Bundle savedInstanceState) {
super.onCreate(savedInstanceState);
setContentView(R.layout.activity_auto_complete_box);
av = (AutoCompleteTextView)findViewById(R.id.autoCompleteTextView1);
ArrayAdapter adp = new ArrayAdapter(AutoCompleteBoxExample.this,android.R.layout.simple_list_item_1,studentname);
 
av.setAdapter(adp);

av.setThreshold(1); // setThreshold method is must call because it describe after how many word typing the hint will available.
}

@Override
public boolean onCreateOptionsMenu(Menu menu) {
// Inflate the menu; this adds items to the action bar if it is present.
getMenuInflater().inflate(R.menu.auto_complete_box, menu);
return true;
}

}

Activity layout code:
 create activity_auto_complete_box.xml in layout folder.


    xmlns:tools="http://schemas.android.com/tools"
    android:id="@+id/LinearLayout1"
    android:layout_width="match_parent"
    android:layout_height="match_parent"
    android:orientation="vertical"
    android:paddingBottom="@dimen/activity_vertical_margin"
    android:paddingLeft="@dimen/activity_horizontal_margin"
    android:paddingRight="@dimen/activity_horizontal_margin"
    android:paddingTop="@dimen/activity_vertical_margin"
    tools:context=".AutoCompleteBoxExample" >

   
        android:id="@+id/autoCompleteTextView1"
        android:layout_width="match_parent"
        android:layout_height="wrap_content"
        android:ems="10" >


Monday, 11 November 2013

Android Widget Example

Android Widget Example

Android Widget are present on android home screen and remotely it can show some part of your activity while activiy is close or pause.

To create Android Widget we required to extends AppWidgetProvider in our activity, and override onUpdate() method.

step1: Code for Activity java file:create an java file with in src/MyWidgetProvider.java.


package in.androidshivendra.androidwidgetapplication;


import java.util.Random;


import android.os.Bundle;
import android.app.Activity;
import android.app.PendingIntent;
import android.appwidget.AppWidgetManager;
import android.appwidget.AppWidgetProvider;
import android.content.ComponentName;
import android.content.Context;
import android.content.Intent;
import android.util.Log;
import android.view.Menu;
import android.widget.RemoteViews;

public class MyWidgetProvider extends AppWidgetProvider {

 private static final String ACTION_CLICK = "ACTION_CLICK";

 @Override
 public void onUpdate(Context context, AppWidgetManager appWidgetManager,
     int[] appWidgetIds) {

   // Get all ids
   ComponentName thisWidget = new ComponentName(context,
       MyWidgetProvider.class);
   int[] allWidgetIds = appWidgetManager.getAppWidgetIds(thisWidget);
   for (int widgetId : allWidgetIds) {
     // Create some random data
     int number = (new Random().nextInt(100));

     RemoteViews remoteViews = new RemoteViews(context.getPackageName(),
         R.layout.widget_layout);
     Log.w("WidgetExample", String.valueOf(number));
     // Set the text
     remoteViews.setTextViewText(R.id.update, String.valueOf(number));

     // Register an onClickListener
     Intent intent = new Intent(context, MyWidgetProvider.class);

     intent.setAction(AppWidgetManager.ACTION_APPWIDGET_UPDATE);
     intent.putExtra(AppWidgetManager.EXTRA_APPWIDGET_IDS, appWidgetIds);

     PendingIntent pendingIntent = PendingIntent.getBroadcast(context,
         0, intent, PendingIntent.FLAG_UPDATE_CURRENT);
     remoteViews.setOnClickPendingIntent(R.id.update, pendingIntent);
     appWidgetManager.updateAppWidget(widgetId, remoteViews);
   }
 }
}

create an style xml file in res/drawable/myshpae.xml
 folder in application.


    android:shape="rectangle" >

   
        android:width="2dp"
        android:color="#00fffa" />

   
        android:angle="225"
        android:endColor="#DDff00"
        android:centerColor="#cccccc"
        android:startColor="#DD000000" />

   
        android:height="20dp"/>

create a layout xml file within res/layaout/widget_layout.xml and put a textview.


    android:id="@+id/layout"
    android:layout_width="match_parent"
    android:layout_height="match_parent"
    android:layout_margin="8dip"
    android:background="@drawable/myshpae" >

   
        android:id="@+id/update"
        style="@android:style/TextAppearance.Medium"
        android:layout_width="match_parent"
        android:layout_height="match_parent"
        android:layout_margin="4dip"
        
        android:gravity="center_horizontal|center_vertical"
        android:text="Static Text" />


create a xml file for widget information with in res/xml/widget_info.xml.


    android:initialLayout="@layout/widget_layout"
    android:minHeight="72dp"
    android:minWidth="146dp"
    android:updatePeriodMillis="2000" 
    >


update manifest file with these code


    package="in.androidshivendra.androidwidgetapplication"
    android:versionCode="1"
    android:versionName="1.0" >

   
        android:minSdkVersion="8"
        android:targetSdkVersion="17" />

   
        android:allowBackup="true"
        android:icon="@drawable/ic_launcher"
        android:label="@string/app_name"
        android:theme="@style/AppTheme" >
       
       
       android:icon="@drawable/ic_launcher"
       android:label="Example Widget"
       android:name="in.androidshivendra.androidwidgetapplication.MyWidgetProvider" >


          android:name="android.appwidget.provider"
          android:resource="@xml/widget_info" />


Time to Test your Widget Application:-

Long Press on right mouse button on Android home screen


Today's Pageviews