Monday 28 October 2013

Android-GPS-Listener-Example

          Android-GPS-Listener-Example             

In Android, The location of Device (Phone)  we can get by Two way.
1. Using Network Provider
2. Using GPS.
Network Provider depend upon your SIM, while GPS depend upon Gps Hardware device.
Now I am going to explain how to create an application that show your device position.

Simple Android Example:

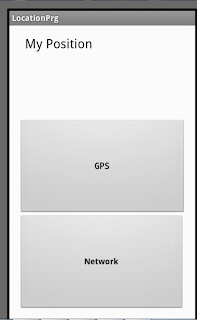
Create an Android Application project named LocationExample.                         


step1: Code for layout xml file: 


    xmlns:tools="http://schemas.android.com/tools"
    android:id="@+id/LinearLayout1"
    android:layout_width="match_parent"
    android:layout_height="match_parent"
    android:orientation="vertical"
    android:paddingBottom="@dimen/activity_vertical_margin"
    android:paddingLeft="@dimen/activity_horizontal_margin"
    android:paddingRight="@dimen/activity_horizontal_margin"
    android:paddingTop="@dimen/activity_vertical_margin"
    tools:context=".MainActivity" >

   
        android:id="@+id/textView1"
        android:layout_width="266dp"
        android:layout_height="wrap_content"
        android:layout_gravity="center"
        android:layout_weight="1"
        
        android:text="My Position"
        android:textAppearance="?android:attr/textAppearanceLarge" />


step 2 : code for Activity source java file.

package com.example.locationexample;

import android.location.Location;
import android.location.LocationListener;
import android.location.LocationManager;
import android.os.Bundle;
import android.app.Activity;
import android.content.Context;
import android.view.Menu;
import android.view.View;
import android.widget.Button;
import android.widget.TextView;
import android.widget.Toast;

public class MainActivity extends Activity {
TextView txt1;
LocationManager locationManager ;
LocationListener locationListener;
private Button btn1,btn2;
    @Override
    public void onCreate(Bundle savedInstanceState) {
        super.onCreate(savedInstanceState);
        setContentView(R.layout.activity_main);


        txt1 = (TextView)findViewById(R.id.textView1);
        btn1 = (Button)findViewById(R.id.button1);
        btn2 = (Button)findViewById(R.id.button2);
        
        locationManager = (LocationManager) this.getSystemService(Context.LOCATION_SERVICE);
       locationListener = new LocationListener() {
            public void onLocationChanged(Location location) {
              
              txt1.setText(String.valueOf(location.getLatitude())+","+String.valueOf(location.getLongitude()));
         Toast.makeText(MainActivity.this,"New Location detected"
        ,Toast.LENGTH_SHORT).show();
            }

            public void onStatusChanged(String provider, int status, Bundle extras) {
           
           
            }

            public void onProviderEnabled(String provider) {}

            public void onProviderDisabled(String provider) {
            Toast.makeText(MainActivity.this,"GPS/Use Wireless network is not enabled" ,Toast.LENGTH_SHORT).show();
           
           
            }
          };

        // Register the listener with the Location Manager to receive location updates
          
          btn1.setOnClickListener(new View.OnClickListener() {
@Override
public void onClick(View v) {
locationManager.requestLocationUpdates(LocationManager.GPS_PROVIDER, 0, 0, locationListener);
}
});
        
          btn2.setOnClickListener(new View.OnClickListener() {
@Override
public void onClick(View v) {
locationManager.requestLocationUpdates(LocationManager.NETWORK_PROVIDER, 0, 0, locationListener);
}
});

    }


@Override
public boolean onCreateOptionsMenu(Menu menu) {
// Inflate the menu; this adds items to the action bar if it is present.
getMenuInflater().inflate(R.menu.main, menu);
return true;
}

}

Step 3: you have to add Three permission   in manifest file by this way..
1.  android.permission.ACCESS_COARSE_LOCATION


2. android.permission.ACCESS_FINE_LOCATION 
3. android.permission.INTERNET  permission


uses-permission android:name="android.permission.ACCESS_COARSE_LOCATION"
    uses-permission android:name="android.permission.ACCESS_FINE_LOCATION"
    uses-permission android:name="android.permission.INTERNET"
step4: Now your application is ready for run. Just Test it.

Open DDMS tool by this way:-
Windows-> Show Views -> other->Android->ShowView->Emulator Control.


Open an Android Google API Emulator.
Now Test your Application.


Friday 25 October 2013

Gesture Application

Gesture Application

Gesture allows users to interact with our  application with screen objects we provide.
Some Core Gesture Set that support by Android.
  1. Touch
  2. Long Press 
  3. Swipe
  4. Drag
  5. Double Touch
  6. Pinch open
  7. pinch close
Gestures are defined by a binary resources which can be created with an example program from the Android SDK. In your activity you can load Gestures via GestureLib.fromRawResource(). If a gesture is detected then the method "onGesturePerformedListener" is called. For this the activity must implement the interface "OnGesturePerformedListener" and must register itself at the GestureOverlayView with the method "addOnGesturePerformedListener()".

Now I am going to show very simple example of Gesture by this you can take your signature through application and store as a image.


Simple Example:

Create an Android Application project named GestureExample.


step1: Code for layout xml file: 


    android:layout_width="fill_parent"

    android:layout_height="fill_parent"

    android:orientation="vertical" >


        android:layout_width="match_parent"
        android:layout_height="wrap_content"
        android:layout_weight="0.40"
        android:orientation="vertical" >

       
            android:id="@+id/gestureOverlayView1"
            android:layout_width="match_parent"
            android:layout_height="match_parent"
           android:eventsInterceptionEnabled="true"
            android:gestureStrokeLengthThreshold="0.1"
            android:gestureStrokeType="multiple" >


        android:layout_width="match_parent"
        android:layout_height="wrap_content"
        android:layout_weight="0.40"
        android:orientation="vertical" >

       
            android:id="@+id/imageView1"
            android:layout_width="match_parent"
            android:layout_height="match_parent"
            android:src="@drawable/ic_launcher" />


        android:layout_width="wrap_content"
        android:layout_height="wrap_content"
        android:orientation="vertical" >

       
            android:id="@+id/button1"
            android:layout_width="wrap_content"
            android:layout_height="wrap_content"
            android:text="Done"
             android:onClick="saveSig" />
   

step 2 : code for Activity source java file.


package in.androidshivendra.gestureexample;

import java.io.File;
import java.io.FileOutputStream;

import android.os.Bundle;
import android.os.Environment;
import android.app.Activity;
import android.gesture.GestureOverlayView;
import android.graphics.Bitmap;
import android.util.Log;
import android.view.Menu;
import android.view.View;
import android.widget.ImageView;

public class GetSign extends Activity {
ImageView img;


@Override
protected void onCreate(Bundle savedInstanceState) {
super.onCreate(savedInstanceState);
setContentView(R.layout.activity_get_sign);
}

@Override
public boolean onCreateOptionsMenu(Menu menu) {
// Inflate the menu; this adds items to the action bar if it is present.
getMenuInflater().inflate(R.menu.get_sign, menu);
return true;
}
  public void saveSig(View view) {
       try {
           GestureOverlayView gestureView = (GestureOverlayView) findViewById(R.id.gestureOverlayView1);
           gestureView.setDrawingCacheEnabled(true);
          Bitmap bm = Bitmap.createBitmap(gestureView.getDrawingCache());
          img  =(ImageView)findViewById(R.id.imageView1);
          img.setImageBitmap(bm);
          File f = new File(Environment.getExternalStorageDirectory()
                   + File.separator + "signature1.png");
           f.createNewFile();
           FileOutputStream os = new FileOutputStream(f);
          os = new FileOutputStream(f);
          
          //compress to specified format (PNG), quality - which is ignored for PNG, and out stream
         bm.compress(Bitmap.CompressFormat.PNG, 100, os);
         os.close();
         
     } catch (Exception e) {
          Log.v("Gestures", e.getMessage());
          e.printStackTrace();
      }
  }

}

Step 3: you have to add android.permission.READ_EXTERNAL_STORAGE and android.permission.WRITE_EXTERNAL_STORAGE  permission in manifest file by this way.


uses-permission android:name="android.permission.READ_EXTERNAL_STORAGE"
uses-permission android:name="android.permission.WRITE_EXTERNAL_STORAGE"

step4: Now your application is ready for run. Just Test it.


Note : you can find your saved siganture image here.
click on Windows-> Show Views -> other->Android->file explorer .
within file explorer pane.
click on mnt->sdcard-> your sign saved.


Download Complete Example Code Here


Sunday 20 October 2013

SMS-Android-Example

SMS Android Example


How to Send an SMS using Android Application?

SmsManager class is responsible for sending sms in Android. 
SMS Manager Manages SMS operations such as sending data, text, and pdu SMS messages.
Step 1:        Initiate SmsManager object by calling SmsManager.getDefault();


 SmsManager smanager = SmsManager.getDefault();

Step 2: send sms by calling sendTextMessage(context,src address, message, sending peding intent, receving pendingintent).
 smanager.sendTextMessage(phoneno, null, msg, null, null);

Simple Example:

Create an Android Application project named SMSProject.

step1: Code for layout xml file: 


    android:layout_width="fill_parent"
    android:layout_height="fill_parent"
    android:orientation="vertical" >

   
        android:id="@+id/textView1"
        android:layout_width="wrap_content"
        android:layout_height="wrap_content"
        android:text="Enter Phone Number: " />

   
        android:id="@+id/editText1"
        android:layout_width="match_parent"
        android:layout_height="wrap_content"
        android:ems="10"
        android:inputType="phone" >


        android:id="@+id/textView2"
        android:layout_width="wrap_content"
        android:layout_height="wrap_content"
        android:text="Enter Message: " />

   
        android:id="@+id/editText2"
        android:layout_width="match_parent"
        android:layout_height="wrap_content"
        android:ems="10"
        android:inputType="textMultiLine" />

   
        android:id="@+id/button1"
        android:layout_width="wrap_content"
        android:layout_height="wrap_content"
        android:text="Send" />

step 2 : code for Activity source java file.


package in.androidshivendra.smsproject;


import android.app.Activity;

import android.os.Bundle;
import android.telephony.SmsManager;
import android.view.View;
import android.view.View.OnClickListener;
import android.widget.Button;
import android.widget.EditText;
import android.widget.Toast;

public class SMSprjctActivity extends Activity {
    /** Called when the activity is first created. */
   EditText edtPhone, edtMsg;
   Button btnSend;
   
@Override
    public void onCreate(Bundle savedInstanceState) {
        super.onCreate(savedInstanceState);
        setContentView(R.layout.main);

edtPhone = (EditText) findViewById(R.id.editText1);
edtMsg = (EditText) findViewById(R.id.editText2);
btnSend = (Button) findViewById(R.id.button1);
btnSend.setOnClickListener(new OnClickListener(){
public void onClick(View v){
String phoneno = edtPhone.getText().toString();
String msg = edtMsg.getText().toString();
try{
SmsManager smanager = SmsManager.getDefault();
smanager.sendTextMessage(phoneno, null, msg, null, null);
Toast.makeText(SMSprjctActivity.this,"Message Sent", Toast.LENGTH_SHORT).show();
edtPhone.setText("");
edtMsg.setText("");
}catch(Exception e){
Toast.makeText(getApplicationContext(), "Message sending failed", Toast.LENGTH_SHORT).show();
e.printStackTrace();
}
}
});
}

}
  

Step 3: you have to add android.permission.SEND_SMS permission in manifest file by this way.


uses-permission android:name="android.permission.SEND_SMS"

step4: Now your application is ready for run. Just Test it.

For testing purpose you just start emulator and put port no. like 5556 in place of phone no. and message in message box then send. your msg will send to your emulator.

Telephony API in Android

How to make phone call from my android application?

To make calling application is very easy. you just required to call an implicit Intent named Intent.ACTION_CALL.
Intent.ACTION_CALL is responsible to call some specific no.

Example:

   Create an Android Application project named PhoneCall.


step1: Code for layout xml file: 


    android:id="@+id/LinearLayout2"
    android:layout_width="fill_parent"
    android:layout_height="fill_parent"
    android:orientation="vertical" >

   
        android:id="@+id/editText1"
        android:layout_width="match_parent"
        android:layout_height="wrap_content"
        android:ems="10"
        android:hint="Enter your no." />

   
        android:id="@+id/button1"
        android:layout_width="match_parent"
        android:layout_height="wrap_content"
        android:text="Call" />


step 2 : code for Activity source java file.


package in.androidshivendra.phonecall

import android.app.Activity;
import android.content.Intent;
import android.net.Uri;
import android.os.Bundle;
import android.view.View;
import android.view.View.OnClickListener;
//import android.widget.EditText;


public class PhoneCallActivity extends Activity implements OnClickListener{
    /** Called when the activity is first created. */
    EditText edtPhone ;
@Override
    public void onCreate(Bundle savedInstanceState) {
        super.onCreate(savedInstanceState);
        setContentView(R.layout.main);
        
        Button callButton =(Button) findViewById(R.id.button1);
     callButton.setOnClickListener(new View.OnClickListener() {
public void onClick(View v) {
// TODO Auto-generated method stub

phonecall();
}
})
        
    }
    
public void phoneCall(){
   
    try{


    edtPhone = (EditText) findViewById(R.id.edtPhone);
    String phonecall = "tel:+"+edtPhone.getText().toString();
   
//     String phonecall = "tel:+5558"; fixed no by this way if you not want to take no from editbox.
   

  Intent phonecallintent = new Intent(Intent.ACTION_CALL);
  
  phonecallintent.setData(Uri.parse(phonecall));

    startActivity(phonecallintent);
    }catch(Exception e){
    e.printStackTrace();
    }
    }
    

}
  

Step 3: you have to add android.permission.CALL_PHONE permission in manifest file by this way.

uses-permission android:name="android.permission.CALL_PHONE"

step4: Now your application is ready for run. Just Test it.

For testing purpose you just start two emulator that port no is may be 5554 and 5556. you run this application in first emulator and in edit box put the port no of second emulator then first emulator generate call for second emulator.


Saturday 12 October 2013

Android Sensors example

Sensor

A sensor is a device, which responds to an input quantity by generating a functionally related output usually in the form of an electrical or optical signal.

In android several type of Sensor present like
  1. Proximity sensor
  2. Accelerator sensor
  3. Gyroscope sensor
  4. Location sensor
To create Sensor Based Application: We have to follow three step.

  1. Create instance of SensorManager
  2. Create instance of Sensor
  3. implement Sensor Event listener

SensorManager

Sensor Manager is use to get device sensor accessibility.

SensorManager mysensormanager = (SensorManager)getSystemService(SENSOR_SERVICE)


Sensor: 

it is a class that hold a particular sensor object.

Sensor mysensor = mysensormanager.getDefaultSensor(Sensor.TYPE_ACCELEROMETER);

implement SensorEventListener: 

Now we have to override onAccuracyChanged(Sensor sensor, int accurracy) and onSensorChanged(SensorEvent event) method. what ever we want using sensor we have to write within onSensorChanged() method.


public void onAccuracyChanged(Sensor sensor, int accuracy) {
     }

     public void onSensorChanged(SensorEvent event) {

     }

Note : Since Sensor is highly responsive so to make power efficient application we have to register and unregister SensorListerner smartly.
               we are normally register sensor event listener in on Resume() menthod  by calling registerListener().
protected void onResume() {
         super.onResume();
         mysensormanager.registerListener(this, mAccelerometer, SensorManager.SENSOR_DELAY_NORMAL);
     }
 and unregister in onPause method by calling unregisterListener(this);

     protected void onPause() {
         super.onPause();
         mSensorManager.unregisterListener(this);
     } 
Android-Sensor-Manager
Android Senor manager work flow


Thursday 10 October 2013

Multiple Button Event Android Example

                           Multiple Button Event Android Example

In my previous example i shown that how to generate an event on a button. i give a small recap here

       public class MainActivity extends Activity {
protected void onCreate(Bundle savedInstanceState) {
super.onCreate(savedInstanceState);
setContentView(R.layout.activity_main);
                          Button btn = (Button) findViewById(R.id.button1);
                              btn.setOnClickListener(new View.OnClickListener() {
@Override
public void onClick(View arg0) {

                  // Write here what you want on a click event

}
});

}

}

Multiple Button Event Android Example

Now i am going to teach how to use multiple button:
                   Step 1: Take more than one Button on Layout File 
                             
android :onClick="setColor": using this tag we specified method name that call on click event from xml side.


Step 2: we have to specified method setColor(View v){}


public void setColor(View v)
{

switch(v.getId())
{
case R.id.button1 :
background.setBackgroundColor(getResources().getColor(R.color.red));
break;
case R.id.button2 :
background.setBackgroundColor(Color.BLUE);
break;
case R.id.button3 :
background.setBackgroundColor(getResources().getColor(R.color.black));
break;
case R.id.button4 :
background.setBackgroundColor(Color.WHITE);
break;
case R.id.button5 :
background.setBackgroundColor(getResources().getColor(R.color.gold));


}
}

Today's Pageviews